Prestashop is one of the most popular CMS on web and it's especially used for e-commerce because it provides you with multiple possibilities to customize your shop online. With Keliweb Prestashop Hosting optimized plan you can easily manage and custom in full autonomy your shop online, according to your activity's needs.
One the most important aspect of Prestashop management is the setting of images' thumbnails, especially after a domain transfer. This kind of operation is very useful if there are missing images or partially visible images on your website's pages, even if they have been correctly uploaded.
You can recreate Prestashop thumbnails by following a few simple steps:
- Enter your Prestashop admin control panel, using your admin username and password;
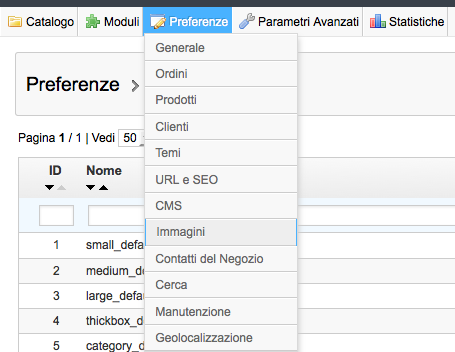
- Click, as you can see in the image below, on the "Preferences" icon and then on the "Images" one: here you will see all the images' settings and their dimension.
At the bottom of the page, you will see the "Recreate thumbnails" section. The operation can take a few minutes, due to the server speed and the dimension/amount of images. By default, the procedure will be processed each time from the beginning- by erasing the old thumbnails and recreating them- if the option is selected. In other terms, if you are processing the operation for the first time you have to keep the option active, otherwise you can unselect the option and Prestashop will restart the operation from the point it was interrupted.
You have to choose, from the "Select imagine" menu, one of the following options, according to the kind of images you want to regenerate:
- All
- Categories
- Producers
- Providers
- Scenes
- Products
- Shops
After selecting the part of the website of which you want to recreate thumbnails, click on "Recreate thumbnails" and wait. If you have processed the operation correctly, you will see the images on your website.
Another important operation in Prestashop management is the alignment of images, in terms of typology, number and dimension. This operation depends on the theme you have installed on your website, for which you have a dedicated documentation.
In general, you can use the following procedure:
- Enter your Prestashop admin panel;
- Enter the "Preferences" section and then the "Images" one;
- Check the documentation of the template you are currently using, usually available in PDF or in a dedicated text format. This operation is very useful to determinate the dimensions of the various formats and the pixel dimensions required by the theme;
- Look for the "Images settings" section and check if they collide with the ones reported in the documentation;
- Enter, if required, your Prestashop control panel and add the dimensions of the missing images by clicking on "Add new", typing height, width and name;
- Scroll down the page until you get to the "Regenerate thumbnails" section and click on the related command. The operation will recreate the missing, partially visible or unmatched images (after the migration, for example). The process can take several minutes, depending on the server speed or on the number/dimension of images.
By the end of the procedure, you will view the previously missing images.