Keliweb provides you with the opportunity to change the main domain of your Linux hosting or Windows hosting.The change has a one-off cost of € 10 + VAT. Subsequently, the customer will bear the cost of the new associated domain, if it is not included in the free extensions included in his hosting plan.
Let's see how and when you can proceed with this operation.
First of all, if there are links recalling the URL, it's necessary to replace each occurrence. For example, if you find, in a website header, the website's logo typed like this:
<img src=”http://old_domain.com/images/logo.png” />
The replacement of the link with the new website name is required to enable the display of the logo:
<img src=”http://old_domain.com/images/logo.png” />
You can change it manually by using a text editor. If you need to change it several times, use tools or commands which can replace any occurrence of the old word with the new one automatically.
We recommend you to save a backup of your data during the replacement to avoid any possibile loss.
In case of Windows systems we recommend the use tools such as wingrep or Find and Replace Tool. In case of Linux systems you will need to type the following command in website's main directory:
find ./ -type f -exec sed -i -e 's/vecchiodominio.it/nuovodominio.com/g' {} \;
If there's a database associated to the website, download it in .sql format using a database manager (phpMyAdmin) and manage it as a regular text file, replacing the old domain with the new one, as in the previous description. You can also use an advanced text editor with the "Replace" option (that you can activate with CTRL+H) to replace the word on the whole file.
In case you use WordPress, you can notice how this CMS saves the website's URL straightly in the database: this may cause redirect problems and a wrong graphic visualization of the website, when you change the domain.
The replacement of any occurrence of the old name with the new one is required. You can do this by opening the configuration file wp-config.php and adding the two following directives:
define('WP_HOME','http://www.yournewdomain.com');
define('WP_SITEURL','http://www.yournewdomain.com');
This will force the URL rewriting, recalled from the database, and it will allow you to enter the website and the admin area. We recommend to update the domain in the database, installing the Automatic Domain Changer plugin. When the domain name is updated in the database, you are able to remove the URL directives that you previously typed in the configuration file.
If you want to modify the database manually, log-in to phpMyAdmin, export it, open it with a text editor and replace each occurrence of the old domain with the new one. Then save it and import it using phpMyAdmin. Make this operation using the tools/commands we previously described.
If your website was created using Joomla, you need to follow a few steps:
- Log-in using FTP/File Manager;
- Open the configuration.php file;
- Select the string public $live_site='vecchio_dominio.it' and replace it with public $live_site='nuovo_dominio.com';
- Save the file.
As you did for Wordpress, the domain name has to be replaced in the database using the same procedure (Export- Modify- Restore).
With Prestashop, you will find a section, in the admin area, where to specify the shop's URL, as you see below:
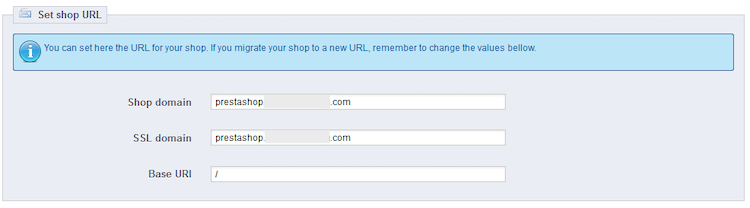
The operation is not available all the times, because the admin area can result inaccessible as you change the domain. In this case, modify the shop's URL from database, as you see below:
1. Log-in to phpMyAdmin, select the associated database and select the table _shop_url;

2. Click on "Edit", typing, in the "Domain" field, the new domain name.
We recommend to replace any occurrence of the old domain with the new one in the database. The procedure is the same for all CMS. Check that the configuration file has the name of the old domain and then replace it and check the presence of the old domain in the database and replace it.
If you are using any component/module/plugin for caching, we suggest you to delete the old cache, using the configuration of the module itself or manually, deleting the directory's cache content of the CMS. The system will recreate it with the new domain name.
For further informations on our web hosting and Cloud hosting plans, please visit our website.